mirror of
https://github.com/YunoHost-Apps/discourse_ynh.git
synced 2024-09-03 18:26:18 +02:00
50 lines
4.1 KiB
Markdown
50 lines
4.1 KiB
Markdown
## Configuration
|
|
|
|
Use the admin panel of your Discourse to configure this app.
|
|
|
|
### Configuring "Reply-By-Email"
|
|
|
|
* You should create a dedicated YunoHost user for Discourse whose mailbox will be used by the *Discourse* application. You can do this with `yunohost user create response`, for example. You should ensure that the email address is configured to be on your Discourse domain.
|
|
|
|
* You should then configure your Discourse `/var/www/discourse/config/discourse.conf` file with the correct SMTP configuration values. Please see [this comment](https://github.com/YunoHost-Apps/discourse_ynh/issues/2#issuecomment-409510325) for an explanation of what values to change. Please be aware, when you update the application, you will have to re-apply this configuration.
|
|
|
|
* You must enable the POP3 configuration for *Dovecot*. See [this thread](https://forum.yunohost.org/t/how-to-enable-pop3-in-yunohost/1662/2) on how to do that. You can validate your configuration with `systemctl restart dovecot && dovecot -n`. Don't forget to open the ports you need (`995` is the default). You can validate that with `nmap -p 995 yunohostdomain.org`.
|
|
|
|
* You should then configure the Pop3 polling in the Discourse admin interface. Please see [this comment](https://meta.discourse.org/t/set-up-reply-via-email-support/14003) for how to do so. You will need to follow step 5 in that comment. You can specify your main Yunohost domain for the `pop3_polling_host`.
|
|
|
|
You should now be able to start testing. Try using the `/admin/email` "Send Test Email" and then view the "Sent" or "Skipped" etc. tabs. You should see a report on what happened with the email. You may also want to look in `/var/www/discourse/log/production.log` as well as `/var/www/mail.err`. You should perhaps also use [Rainloop](https://github.com/YunoHost-Apps/rainloop_ynh) or another Yunohost email client application to quickly test that both your user and the dedicated Yunohost Discourse user (`response@...`) is receiving mail.
|
|
|
|
### "Reply-By-Email" and mail forwarding
|
|
|
|
If you use the administration UI in YunoHost to setup a mail forwarding address for your users then you may face the problem whereby your users are replying by email from the forwarded email address and the *Discourse* software is not able to understand how to receive that email.
|
|
|
|
For example, your user has email address `foo@myyunohostdomain.org` and all mail is forwarded to `foo@theirexternalmail.com`. *Discourse* receives replies from `foo@theirexternalmail.com` but cannot understand how to deliver this to the user account with `foo@myyunohostdomain.org` configured.
|
|
|
|
Their is on-going work to allow for [multiple email addresses for one user](https://meta.discourse.org/t/additional-email-address-per-user-account-support/59847) in Discourse development but at current major version (2.3 as of 2019-08-06), there is no web interface for this functionality. It is possible to set it up via the command-line interface but it is **experimental** and you should not undertake this work unless you take some time to understand what it is you are going to do.
|
|
|
|
Here's how to setup a secondary mail address for a user account:
|
|
|
|
```bash
|
|
$ cd /var/www/discourse
|
|
$ RAILS_ENV=production /opt/rbenv/versions/2.6.0/bin/bundle exec rails c
|
|
$ UserEmail.create!(user: User.find_by_username("foo"), email: "foo@theirexternalmail.com")
|
|
```
|
|
|
|
Discourse can now receive mail from `foo@theirexternalmail.com` and give it to the user account with mail address `foo@myyunohostdomain.org`.
|
|
|
|
#### Multi-user support
|
|
|
|
Supported, with LDAP and SSO.
|
|
|
|
|
|
|
|
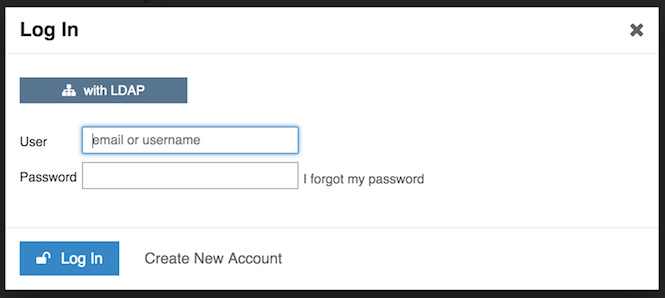
Default administrator and YunoHost users must login using LDAP:
|
|
* click on the "with LDAP" button
|
|
* use your YunoHost credentials
|
|
|
|
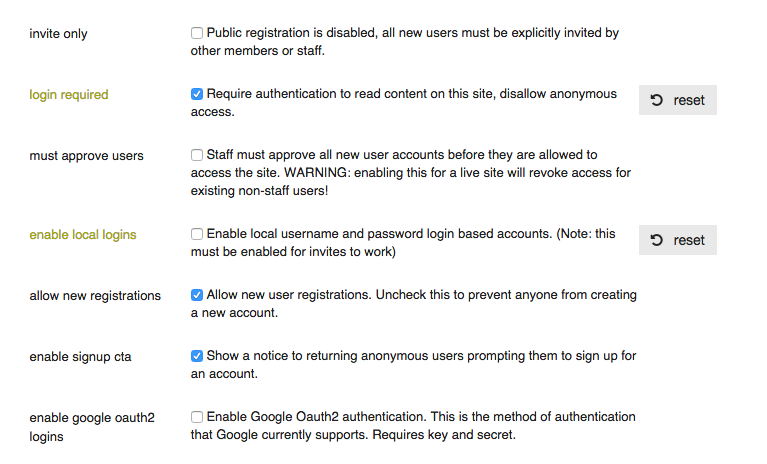
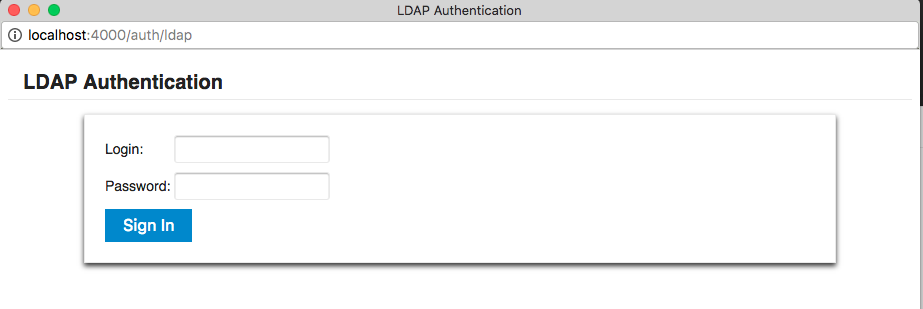
When disabling Local Login and other authentication services, clicking the `Login` or `Sign Up` button will directly bring up the LDAP Login popup.
|
|
|
|
|
|
|
|
|
|
|